Neovim for Haskell Development
Here’s how I setup neovim or vim 8 to be a functional working environment.
Updated Feb. 2020: Many things have changed in the Haskell/vim ecosystem, and I am not working with Haskell currently. Here is a summary of changes:
For full IDE features in vim/neovim, the current popular option looks like coc.vim combined with haskell-ide-engine. (I can’t recommend this personally only because I have not tried it myself)
intero is no longer being maintained, but intero-neovim is still useful in plain GHCi mode. My neovim config has an example of this setup.
ghc-mod is no longer maintained so don’t use any plugins that rely on it. Development effort has moved to haskell-ide-engine.
hdevtools was working the last time I tried it, but I do not know its current status.
The focus will be on Haskell, but many of the plugins here are useful for any language in both vim and neovim.
Limits of Vim
My vim config for PureScript had been working nicely for me this year, but my Haskell setup was lacking in features.
I started working through Stephen Diehl’s vim article, adding plugins for autocompletion, snippets, and tab alignment.
The features were now there, but performance in vim had gone down noticeably. Opening a file for the first time would take about 4 seconds (as indicated by vim’s profile feature).
On top of that, vim does not support Intero, which is supposed to be the killer feature of Haskell on Emacs. I thought maybe it was time to finally tackle the Emacs learning curve for the sake of Haskell development.
Then I discovered there is Intero support for neovim. Also, some of the plugins I had just installed were intended first for neovim, and only worked in vim 8 through compatibility plugins.
Surely neovim ought to have better performance for these plugins. Right? ![]()
How I Vim
Before I go over the plugins I have chosen to use, I want to show how I use git to save my vim setup for use on multiple machines.
First of all, I load my plugins using Pathogen. With Pathogen, you only have to download the plugin to ~/.vim/bundle/ and it will be loaded when vim starts.
My .vim folder is a git repo that I push to GitHub, so I can access it when setting up a new machine. Since most vim plugins can also be found on GitHub, I add them to this repo as git submodules.
cd ~/.vim/bundle/
git submodule add https://github.com/neovimhaskell/haskell-vim.git
The primary benefit here is that I can update all my plugins by updating submodules:
git submodule update --recursive --remote
Downloading my .vim repo on a new machine therefore requires the --recursive option to also download submodules:
git clone --recursive https://github.com/johnmendonca/vimrc.git .vim
The downside to this approach is that removing submodules can be a pain.
Installing neovim
Installing neovim depends on your system.
In my case (Linux Mint), there is no system package for neovim. I followed the installation instructions to install using the Ubuntu PPA.
Start neovim by running:
nvim
Now with a fresh working install of neovim, we are ready to start setting it up.
Configuring neovim
The config file for neovim exists at ~/.config/nvim/init.vim, rather than ~/.vimrc. If you want to use your existing vim config in neovim, you can do that.
First I copied over my basic .vimrc commands over to ~/.config/nvim/init.vim:
syntax on
filetype plugin indent on

set nocompatible
set number
set showmode
set smartcase
set smarttab
set smartindent
set autoindent
set expandtab
set shiftwidth=2
set softtabstop=2
set background=dark
set laststatus=0

colo darkblue
hi Keyword ctermfg=darkcyan
hi Constant ctermfg=5*
hi Comment ctermfg=2*
hi Normal ctermbg=none
hi LineNr ctermfg=darkgrey
Some of these may be redundant in neovim.
Pathogen
Pathogen is the foundation for installing all plugins.
mkdir -p ~/.config/nvim/autoload
cd !$
wget https://raw.githubusercontent.com/tpope/vim-pathogen/master/autoload/pathogen.vim
In ~/.config/nvim/init.vim add:
execute pathogen#infect()
Now your plugins in ~/.config/nvim/bundle/ should be loaded whenever neovim starts.
Plugins
I have shown above how to install a plugin as a git submodule, but the minimum that you need to install any plugin is to download it into your bundle folder:
cd ~/.config/nvim/bundle/
git clone https://github.com/neovimhaskell/haskell-vim.git
This is the same for all the plugins listed here.
Let’s start with the most general purpose plugins and move to those specifically for Haskell.
NERDTree
NERDTree will provide a vim split with your project folder structure that you can use to browse, create, delete, copy, or move files without typing out the full commands.
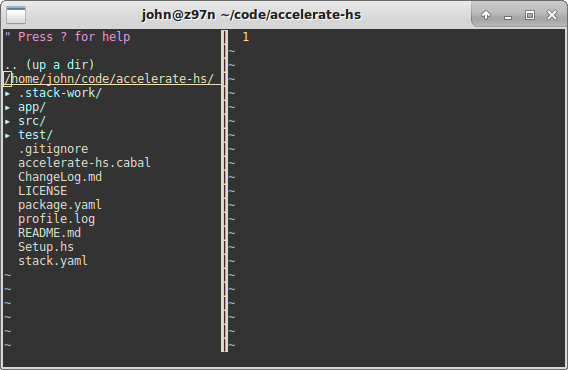
Install the plugin and modify your init.vim:
"Open NERDTree when nvim starts
autocmd StdinReadPre * let s:std_in=1
autocmd VimEnter * if argc() == 0 && !exists("s:std_in") | NERDTree | endif

"Toggle NERDTree with Ctrl-N
map <C-n> :NERDTreeToggle<CR>

"Show hidden files in NERDTree
let NERDTreeShowHidden=1
ctrlp.vim
ctrlp.vim allows you to perform a fuzzy name search on the files within your project directory. This brings the killer feature of Sublime Text into vim.
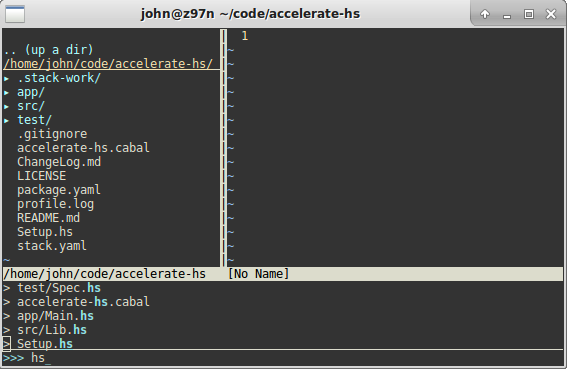
Simply install and restart nvim. Now whenever you press <Ctrl-p> a new file search window should appear.
Grepper
Grepper performs text search throughout the files in your project. I had previously used ack.vim but it requires you to install the Perl tool ack.
I don’t use text search in my work very often, and both of these plugins mess up my splits sometimes. There are times when text search is critical though, and I wouldn’t be without a plugin like this.
Grepper supports a variety of search tools, but the default works fine for me. I bind the key command \ga to search the entire project, and \gb to search only the current buffer:
"Use Grepper
nnoremap <leader>ga :Grepper<cr>
nnoremap <leader>gb :Grepper -buffer<cr>
Now you can search for the text “foo” throughout your project by typing the following in command mode:
\gafoo<Enter>
Vim Tmux Navigator
This one is for tmux users only. tmux is useful when you’re working on a remote server and don’t want to worry about your ssh session becoming disconnected. It also allows you to split one terminal emulator into many terminal windows.
I use both tmux and vim window splits at the same time. For example here is my screen while writing this page (using vim 8):
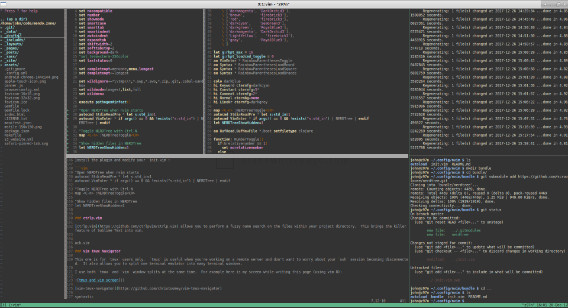
Vim Tmux Navigator allows you to move between both types of splits seamlessly using one set of key commands. After this is setup you will be able to move between all splits using <Ctrl> + <h, j, k, l>.
These are the same keys for moving around within a vim document. Now just hold <Ctrl> and you will be moving between splits.
Configuration changes are needed for tmux, add this to your ~/.tmux.conf:
# Smart pane switching with awareness of Vim splits.
# See: https://github.com/christoomey/vim-tmux-navigator
is_vim="ps -o state= -o comm= -t '#{pane_tty}' \
    | grep -iqE '^[^TXZ ]+ +(\\S+\\/)?g?(view|\.?n?vim?x?(-wrapped)?)(diff)?$'"
bind-key -n C-h if-shell "$is_vim" "send-keys C-h"  "select-pane -L"
bind-key -n C-j if-shell "$is_vim" "send-keys C-j"  "select-pane -D"
bind-key -n C-k if-shell "$is_vim" "send-keys C-k"  "select-pane -U"
bind-key -n C-l if-shell "$is_vim" "send-keys C-l"  "select-pane -R"
bind-key -n C-\ if-shell "$is_vim" "send-keys C-\\" "select-pane -l"
bind-key -T copy-mode-vi C-h select-pane -L
bind-key -T copy-mode-vi C-j select-pane -D
bind-key -T copy-mode-vi C-k select-pane -U
bind-key -T copy-mode-vi C-l select-pane -R
bind-key -T copy-mode-vi C-\ select-pane -l
This plugin has worked well for me in vim, and does not require config changes if you use the default key bindings.
Some people have problems getting this to work right with neovim. There are some outstanding issues with neovim that you should check if you have trouble.
I encountered one of these issues, where <Ctrl-h> would not work in neovim inside tmux (the keypress registers as Backspace). The following change to init.vim is a workaround:
"Hack for neovim and vim-tmux-navigator
nnoremap <silent> <BS> :TmuxNavigateLeft<cr>
Previously I had installed neovim through Nix, and had an issue caused by binary names used in Nix. If you installed neovim though Nix, use my tmux config above and not the default from the plugin README. There is a necessary regex change for Nix binary support.
vim-gitgutter
vim-gitgutter will show git diff information in a column along the left edge of your file. You will be able to see which lines are new or modified, and where lines have been removed. It’s a little convenience that saves you a trip to the console.
If you want to run even more git commands within your editor, check out fugitive.vim.
Haskell IDE
Let’s look at the plugins that will allow us to turn neovim into a Haskell IDE. Thanks to Stephen Diehl and Jake Zimmerman for much of this information.
haskell-vim
haskell-vim provides an alternative syntax highlighter, and options for indentation. Here are my settings for init.vim:
let g:haskell_classic_highlighting = 1
let g:haskell_indent_if = 3
let g:haskell_indent_case = 2
let g:haskell_indent_let = 4
let g:haskell_indent_where = 6
let g:haskell_indent_before_where = 2
let g:haskell_indent_after_bare_where = 2
let g:haskell_indent_do = 3
let g:haskell_indent_in = 1
let g:haskell_indent_guard = 2
let g:haskell_indent_case_alternative = 1
let g:cabal_indent_section = 2
Intero
Intero for Neovim will run a GHCi console process inside neovim, making it convenient to reload your files and enter expressions.
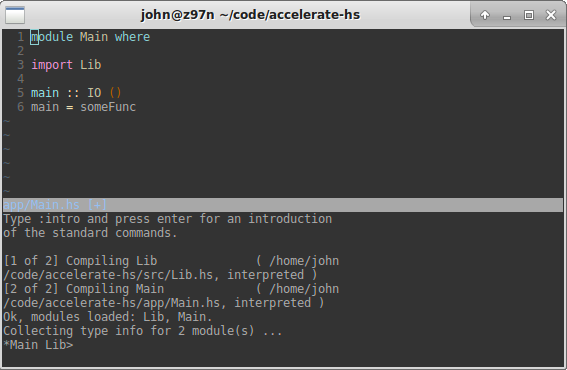
This plugin uses stack by default but can be configured otherwise. Another alternative is neovim-ghci.
The first time you open a Haskell file after installing the plugin, it will automatically open a split in vim and build intero for your stack project.
The example configuration on the GitHub page is a good place to start, though I have the following setup for my needs:
" Automatically reload on save
au BufWritePost *.hs InteroReload

" Lookup the type of expression under the cursor
au FileType haskell nmap <silent> <leader>t <Plug>InteroGenericType
au FileType haskell nmap <silent> <leader>T <Plug>InteroType
" Insert type declaration
au FileType haskell nnoremap <silent> <leader>ni :InteroTypeInsert<CR>
" Show info about expression or type under the cursor
au FileType haskell nnoremap <silent> <leader>i :InteroInfo<CR>

" Open/Close the Intero terminal window
au FileType haskell nnoremap <silent> <leader>nn :InteroOpen<CR>
au FileType haskell nnoremap <silent> <leader>nh :InteroHide<CR>

" Reload the current file into REPL
au FileType haskell nnoremap <silent> <leader>nf :InteroLoadCurrentFile<CR>
" Jump to the definition of an identifier
au FileType haskell nnoremap <silent> <leader>ng :InteroGoToDef<CR>
" Evaluate an expression in REPL
au FileType haskell nnoremap <silent> <leader>ne :InteroEval<CR>

" Start/Stop Intero
au FileType haskell nnoremap <silent> <leader>ns :InteroStart<CR>
au FileType haskell nnoremap <silent> <leader>nk :InteroKill<CR>

" Reboot Intero, for when dependencies are added
au FileType haskell nnoremap <silent> <leader>nr :InteroKill<CR> :InteroOpen<CR>

" Managing targets
" Prompts you to enter targets (no silent):
au FileType haskell nnoremap <leader>nt :InteroSetTargets<CR>
With this config, Intero will start automatically and I can open a terminal split using \nn, then hide it again using \nh.
Using the terminal in neovim is a little strange. Move to the split and press i to enter Terminal mode (not insert mode) and you can enter commands into the REPL. Exit terminal mode by pressing <Ctrl-\> <Ctrl-n>.
The author of the plugin has an example keybinding to make exiting terminal mode a little more intuitive. I have adapted his example to use the split movement keys we setup in the tmux section:
" Ctrl-{hjkl} for navigating out of terminal panes
tnoremap <C-h> <C-\><C-n><C-w>h
tnoremap <C-j> <C-\><C-n><C-w>j
tnoremap <C-k> <C-\><C-n><C-w>k
tnoremap <C-l> <C-\><C-n><C-w>l
You still need to hit i to enter terminal mode. Alternatively, you can use :InteroEval to enter an expression in the REPL without moving panes at all.
With my config, you can type \ne2+2<Enter> to execute 2+2 in the REPL without ever leaving your file.
Testing
When you are writing tests for a Stack project, and want to use Intero to load and run your test code, you have to first change the target using :InteroSetTargets. The reason for this is that a Stack project may have different dependencies for a library or executable versus your test code. So, unless you change to the testing target, dependencies like hspec will not be loaded and available to Intero.
When I am working on a spec I want to save my file and run the spec without moving to the console. I can bind the expression hspec spec to the command \nb using :InteroSend:
" Run the spec in the current file
au FileType haskell nnoremap <silent> <leader>nb :InteroSend hspec spec<CR>
Neomake
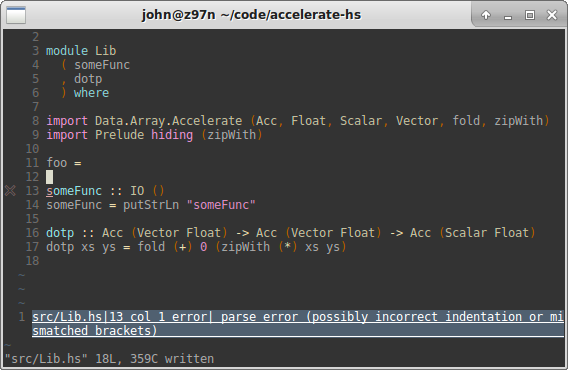
Neomake allows us to run programs against our files and project. By default for Haskell files, neomake will use ghc-mod, hlint, and hdevtools to check your files
These programs need to be installed first:
stack install ghc-mod hlint hdevtools
Neomake is an alternative for Syntastic. Add this to your init.vim to have checks ran against your file every time you save it:
call neomake#configure#automake('w')
Neomake will highlight lines of code with issues, and the command :lopen will open a window listing the issues. If you want to have this window open automatically use this config:
let g:neomake_open_list = 2
Intero uses Neomake to do syntax checks on your files. I prefer to use Intero only and none of the others. This config will disable the default checkers:
let g:neomake_haskell_enabled_makers = []
Now only Intero will perform syntax checks when a file is saved, and we can still manually run the other checks if desired:
:Neomake ghcmod
:Neomake hlint
:Neomake hdevtools
ghcmod-vim
ghcmod-vim allows you to use ghc-mod commands in vim. You can display the type of the item under the cursor, or expand a function definition for all the cases of a data type.
You have to also install vimproc. This plugin requires an extra installation step depending on your system. On linux:
cd bundle/vimproc.vim/
make
Since there is overlap between this plugin and Intero, I only use a couple commands:
au FileType haskell nmap <leader>mc :GhcModSplitFunCase<CR>
au FileType haskell nmap <leader>ms :GhcModSigCodegen<CR>
vim-hindent / vim-stylishask
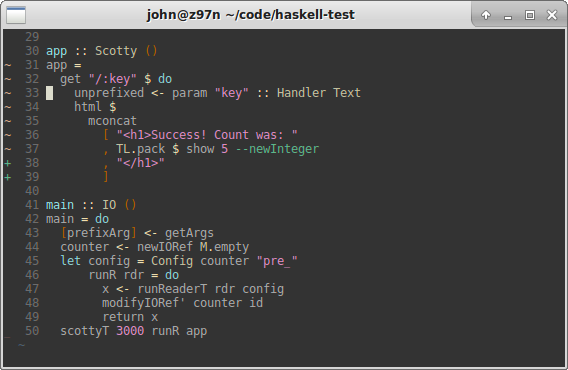
vim-hindent and vim-stylishask are pretty-printers that will reformat your source code to match standard style guides. The programs need to be installed first:
stack install hindent stylish-haskell
The resulting code looks very nice! ![]()
I have set these tasks to only be run manually:
let g:hindent_on_save = 0
au FileType haskell nnoremap <silent> <leader>ph :Hindent<CR>

let g:stylishask_on_save = 0
au FileType haskell nnoremap <silent> <leader>ps :Stylishask<CR>
These plugins can also process your file every time you save. Just replace a 0 with a 1 above on the printer you want to use.
Tabular
Tabular allows you to align characters in multiple rows. For example, this can align the = in a series of assignments, or the -> in a set of pattern matches.
nnoremap <leader>= :Tabularize /=<CR>
nnoremap <leader>- :Tabularize /-><CR>
nnoremap <leader>, :Tabularize /,<CR>
nnoremap <leader># :Tabularize /#-}<CR>
Pressing \= inside the following code block:
area Point = 0
area (Square x) = x * x
area (Rectangle x y) = x * y
will reformat it into:
area Point           = 0
area (Square x)      = x * x
area (Rectangle x y) = x * y
vim-hsimport
vim-hsimport will insert import statements for the identifier under the cursor. It is based on hsimport and hdevtools which must be installed first:
stack install hsimport hdevtools
It also requires a globally accessible ghc command. Using this plugin with Stack resulted in an error for me, until I added the location of ghc to my system path. It is a bit of a hack, but I added the following to my .bashrc file:
# Put GHC on the path globally
GHC_PATH=`stack path | grep compiler-bin | sed -e 's/compiler-bin: //'`
export PATH="$PATH:$GHC_PATH"
Also kill any hdevtools processes, so it will restart ![]() :
:
pkill hdevtools
Once installed, you can add insert statements for entire modules or individual symbols:
au FileType haskell nnoremap <silent> <leader>ims :HsimportSymbol<CR>
au FileType haskell nnoremap <silent> <leader>imm :HsimportModule<CR>
deoplete.nvim
deoplete is a general framework for completions in neovim. It requires installation of a Python 3 module:
pip3 install neovim
Vim 8 requires a couple extra plugins for compatibility.
Activate deoplete when nvim starts:
" Use deoplete.
let g:deoplete#enable_at_startup = 1
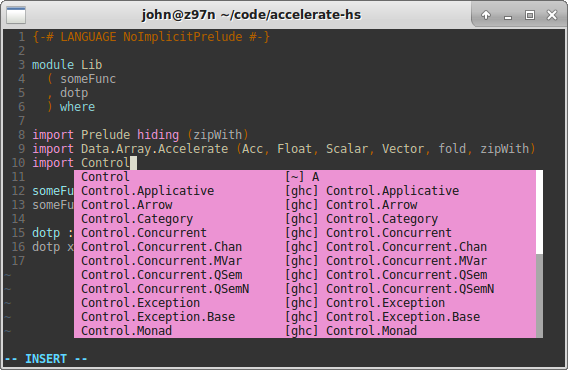
Now when you are typing, you should see a completion menu recommending other words from your file. You can select them with the arrow keys and hit <Enter> to insert your choice.
We’ll add a couple more plugins to make this more useful.
supertab
supertab will allow us to choose a completion with the Tab key instead of the arrow keys.
Setup the Tab key to call vim’s omnifunc:
let g:SuperTabDefaultCompletionType = '<c-x><c-o>'
neco-ghc
neco-ghc uses ghc-mod to fill the autocomplete menus with useful Haskell options.
" Disable haskell-vim omnifunc
let g:haskellmode_completion_ghc = 0

" neco-ghc
autocmd FileType haskell setlocal omnifunc=necoghc#omnifunc
let g:necoghc_enable_detailed_browse = 1
SnipMate / UltiSnips
SnipMate and UltiSnips will allow you to paste snippets into your documents. If you have any sort of boilerplate code that you use often, these plugins can save you some time.
Which plugin to choose depends on what snippets file you want to use. I have not used these enough to have a preference.
Here are some haskell snippets to pick from:
Conclusion
Thank you for joining me on this tour of great open source software.
If you like what you’ve seen here, you can download and use my neovim configuration:
I am happy with this setup, as it delivers the performance and usability improvements I had hoped for.
If you find that this article has missed something, or if you have any other suggestions, please contact me on Twitter at @johnmendonca.
