
Beginner’s Haskell: Creating Bitmap Images
Let’s use the library gloss in Haskell to easily display images. We’ll explore the types used by gloss and create a bitmap using ByteString.
Project Setup
We’ll use stack for this project, which I recommend for anyone starting out with haskell.
Download and Install Stack
Run this command to create a directory with your new project:
stack new gloss-bitmaps
Run the following to confirm the project is working. This may take some time when downloading GHC and libraries.
cd gloss-bitmaps/
stack setup
stack build
stack exec gloss-bitmaps-exe
This should print the text someFunc. If this is not working at this point, you will need to troubleshoot your stack installation or setup.
Finding Documentation
Usage examples for Haskell libraries can be hard to find, and we often must rely on library documentation. I would like to explore the process for finding API documentation, using gloss as an example.
Searching for “graphics libraries in Haskell” turns up this list: Applications and libraries/Graphics. The HaskellWiki is often a good source for high level overviews like this.
Through search results and listings, I see gloss is a popular library and has a high-level API with examples.
The top level hackage page for gloss does not have any information about basic usage. This page is what you will usually find when searching for a Haskell library. We need to dig into the module documentation.
There is a Modules section on the hackage page, let’s click the top level module for more information: Graphics.Gloss.
This page works as a starting point. We have a basic example and API documentation for the top level functions. There are many other modules to explore from the main hackage page when we need to use them.
Let’s start with the example in the gloss documentation.
Basic gloss
First we will need to add gloss as a dependency for our project. Edit the gloss-bitmaps.cabal file and add it to the library section:
library
  hs-source-dirs:      src
  exposed-modules:     Lib
  build-depends:       base >= 4.7 && < 5
                     , gloss
  default-language:    Haskell2010
Stack uses hpack in its default project template to specify project settings. We will only use the cabal file in this article, so please delete the hpack config before building:
rm package.yaml
Edit the library source file src/Lib.hs, and add the example code from the gloss documentation:
module Lib
    ( someFunc
    ) where

import Graphics.Gloss

someFunc :: IO ()
someFunc = display (InWindow "Nice Window" (200, 200) (10, 10)) white (Circle 80)
Rebuild and run:
stack build
stack exec gloss-bitmaps-exe
The program should open a new window with a drawing of a circle.
display
Let’s take a look at the type for the display function, found in the module documentation:
display :: Display      -- Display mode.
        -> Color        -- Background color.
        -> Picture      -- The picture to draw.
        -> IO ()
In our example, the first argument to display is:
(InWindow "Nice Window" (200, 200) (10, 10))
This must have the type Display. Sure enough, we can confirm this in the documentation (and in the source code). The data type Display has two constuctors:
data Display
        -- Display in a window with the given name, size and position.
        = InWindow   String (Int, Int) (Int, Int)

        -- Display full screen.
        | FullScreen
Experiment with this and see if you can change the window size or display the image in full screen.
The second parameter of display is very straight forward. It is the background color for our display. In our case we are passing white, which is a value from the gloss library.
The third parameter is of type Picture. We are passing the value (Circle 80). From this we can infer that Circle is a constructor which takes a number (the radius) and returns a Picture of a circle.
Drawing Bitmaps
We’ve got a lot going for us already with just this one line of code. We know if we have a Picture, we have a way to display it. Instead of using drawing functions like circle or line, let’s find out how to make a bitmap Picture.
A bitmap image is basically just a big list of pixels. A 100x100 image would have 10,000 pixels. Each pixel is a 32-bit RGBA value. The value is broken into 4 bytes, one each for red, green, blue, and alpha (transparency).
The RGBA system allows us to specify any color and transparency. For example, in CSS if you wanted a nearly transparent purple, you could say:
rgba(128, 0, 128, 0.25);
Bitmaps in gloss
We need to dig through the documentation again to find out how to create a bitmap Picture. The top level module has a reference to a Bitmap module so let’s check that out: Graphics.Gloss.Data.Bitmap
(Please note if you want to view the source code: this code is imported from another package called gloss-rendering: Graphics.Gloss.Rendering)
There are some promising looking functions here, the best one for us uses ByteString:
bitmapOfByteString :: Int
                   -> Int
                   -> BitmapFormat
                   -> ByteString
                   -> Bool
                   -> Picture

-- Copy a ByteString of RGBA data into a bitmap with the given width and height.

-- The boolean flag controls whether Gloss should cache the data between frames for speed.
ByteString is a basic Haskell type to represent binary data without any assumption of encoding. There are also functions to create bitmaps from a BMP or ForeignPtr Word8. These other functions might be useful if we were loading an image from a file or from memory created by another program.
Since we are just generating one image in Haskell, ByteString should be the easiest to work with. We are not going to worry about performance this time.
Looking at the type and documentation for bitmapOfByteString, we can see the first two Int parameters are for the width and height of the image. Let’s say those will both be 100 for a 100x100 image.
The last parameter is a Bool to turn on caching provided by gloss. Since we are just drawing one image and not changing it, this feature will not matter. Let’s just pass True.
This remaining two parameters have the types BitmapFormat and ByteString. We know the ByteString will hold the binary data for our image, so the BitmapFormat must describe how that data should be formatted.
BitmapFormat
We just need to lookup BitmapFormat in our module documentation:
data BitmapFormat
        = BitmapFormat
        { rowOrder    :: RowOrder
        , pixelFormat :: PixelFormat }
This type uses Haskell record syntax, we can simplify this for clarity:
data BitmapFormat = BitmapFormat RowOrder PixelFormat
BitmapFormat is just a combination of RowOrder and PixelFormat. Let’s look at these:
data RowOrder
        = TopToBottom
        | BottomToTop

data PixelFormat
        = PxRGBA | PxABGR
These two settings say how our binary image data will be interpreted. RowOrder determines if the first bytes in our data are for the top or bottom row in our image. PixelFormat similarly determines what order the bytes in each pixel should be.
We can choose any format as long as our image data matches. Let’s use this as our format:
BitmapFormat TopToBottom PxRGBA
Now all we need is our bitmap data in a ByteString. Let’s update our library code to include everything we have looked at.
module Lib
    ( someFunc
    ) where

import Graphics.Gloss

bitmapData = undefined

ourPicture :: Picture
ourPicture = bitmapOfByteString 100 100 (BitmapFormat TopToBottom PxRGBA) bitmapData True

someFunc :: IO ()
someFunc = display (InWindow "Nice Window" (200, 200) (10, 10)) white ourPicture
This code will compile but will not run due to the presence of undefined in the place of actual data. We will fill that in next.
Generating a ByteString
Now we know what format our data should be in, next we need to find out how to create a ByteString. We’ll go to the module documentation like we did before: Data.ByteString
Here is the description of ByteString:
A space-efficient representation of a Word8 vector, supporting many efficient operations.
Word8 is going to be relevant for us, as this is the Haskell type for one byte. If we wanted to represent our purple pixel from earlier (rgba(128, 0, 128, 0.25)) as a list of Word8, it would look like this:
purple :: [Word8]
purple = [128, 0, 128, 64]
A fully opaque red pixel would look like this:
red :: [Word8]
red = [255, 0, 0, 255]
We just need 10,000 of these in a ByteString and we should have a working image. There is a function in the docs which will work for this:
pack :: [Word8] -> ByteString
Our single pixel has 4 bytes in a list, so we’ll need 40,000 bytes in a list to generate the ByteString for a 100x100 image. Let’s first try to make an image of just one color. There is a function that will allow us to turn our pixels above into an infinite list of pixels:
cycle :: [a] -> [a]

-- cycle ties a finite list into a circular one, or equivalently, the infinite repetition of the original list
Laziness in Haskell makes working with infinite lists possible, since the elements of the list are not actually created until asked for. We use the take function to take some values from a list.
take 12 (cycle purple)

-- [128,0,128,64,128,0,128,64,128,0,128,64]
Alright, we are ready to update our code to draw a purple image. First, add the bytestring package to gloss-bitmaps.cabal:
library
  hs-source-dirs:      src
  exposed-modules:     Lib
  build-depends:       base >= 4.7 && < 5
                     , gloss
                     , bytestring
  default-language:    Haskell2010
Add the bitmap data to our library source file:
module Lib
    ( someFunc
    ) where

import Graphics.Gloss
import Data.Word
import Data.ByteString (ByteString, pack)

purple :: [Word8]
purple = [128, 0, 128, 64]

bitmapData :: ByteString
bitmapData = pack $ take 40000 (cycle purple)

ourPicture :: Picture
ourPicture = bitmapOfByteString 100 100 (BitmapFormat TopToBottom PxRGBA) bitmapData True

someFunc :: IO ()
someFunc = display (InWindow "Nice Window" (200, 200) (10, 10)) white ourPicture
Rebuild and run:
stack build
stack exec gloss-bitmaps-exe
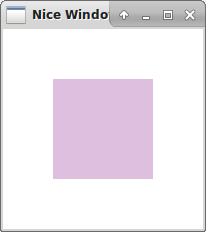
At this point you have enough info to start playing around with pixel images. Try writing code to generate some different types of pixels.
In a future post, we will use IO in Haskell to produce randomly generated pixels.
The example code can be found on GitHub